Category Archives: webMethods

The category is mainly a disscusion forum about using webMethods/SoftwareAG product

Integrate PowerShell script with webMethods service

PowerShell script is quite handy when you are inside a windows environment. Sometime you might need to utilize existing powershell script in webMethods to suits your needs. This article is to share some ideas how to integrate PowerShell script into webMethods.

Run a Powershell script from the command line

The basic PowerShell tutorial: https://msdn.microsoft.com/en-us/powershell/scripting/core-powershell/console/powershell.exe-command-line-help. This gives basic idea how to run a Powershell script from the command line with parameter, here is the command syntax:
PowerShell[.exe] [-File <FilePath> [<Args>]]

Here is sample PowerShell script which search for a certain string in all files under a directory.

When invoke this script from command line, you need to add two parameters separated by space. Below is the return of script.
image0021

Execute OS command from webMethod Service

webMethods has provided a built-in java service that can execute command. This build-in service is access controlled which you need change OSCommand.cnf in WmPublic package before you execute this service. Alternatively, you can create your own java service which will give a bit more control of using it. Here is the sample code:

A real sample

I wrote a little PowerShell script to count number of hits on WebSphere web service. My WebSphere wrote all SOAP requests input and output into system.log file same as how webMethods generate server.log. PowerShell script was searching for a particular string in all log files within a folder. Then webMethods flow service collects the results and converts them into table.

Finally and most important, use Google Chart java script to build this colorful column chart

.image0041.jpg

Integrate Axis2 within WmTomcat

Integrate Axis2 within WmTomcat

Software AG Web Services Stack is a toolkit that enables users to create, configure, deploy, and manage web services. WS-stack is built on AXIS2 platform and has its own context root “wsstack” binding with default port 10010. This practise is to integrated Axis2 in a Servlet Container which WmTomcat in this case.

Download Axis2 WAR (Web Archive) distribution

This is the Web application of Axis2, which can be deployed in most of the servlet containers. You can download the latest version of Axis2 WAR from: http://axis.apache.org/axis2/java/core/download.cgi

Deploy Axis2 WAR in Tomcat

Hot deployment allows you to place a war file in a single directory and have WmTomcat unpack the web application files to the proper directory and update the application without having to manually reload the package.

1. Place your war file in the directory IntegrationServer/web/webapps.
2. Execute the wm.tomcat.admin:hotDeploy service. When this service executes, it checks the IntegrationServer/web/webapps directory.

Once hotDeploy service been executed, you can find new package axis has been created in IntegrationServer/packages. All components have been deployed in subfolder web.

Enable SOAP Monitor in Axis2

In Axis2 , SOAP Monitor utility is to provide a way for the developers to monitor these SOAP messages without requiring any special configuration or restarting the server. As SOAP requests and responses are received, the SOAP message information is forwarded to a SOAP monitor service where it can be displayed using a Web browser interface. The SOAP message information is accessed by a Web browser by going to http://localhost:5565/web/axis2/SOAPMonitor.

1. Enable SOAP Monitor by inserting the following in axis2.xml file. Axis2.xml file is located at IntegrationServer/packages/axis2/web/WEB-INF/conf
<module ref=”soapmonitor”/>

2. Place the applet classes into web application so that they can be loaded into the web browser. You can get the compiled applet classes from the WEB-INF/lib/axis2-soapmonitor-servlet-1.7.3.jar which is inside the extracted axis2.war. Unpack the jar file to the place IntegrationServer/packages/axis2/web

3. Use a web brower which support java applet like IE. Go to http://localhost:5565/web/axis2/SOAPMonitor. This will show the SOAP Monitor applet used to view the service requests and responses.

Enable Axis2 services

There is an issue with the addressing module because org.apache.axis2.handlers.addressing.AddressingInHandler is present both in the webMethods runtime and the addressing module shipped with Axis2. Since the module class loader is parent-first (and the class is not present in the Web application class loader), it is webMethods’s version of the class that will be loaded. This results in the following exception:

java.lang.ClassCastException: org.apache.axis2.handlers.addressing.AddressingInHandler incompatible with org.apache.axis2.engine.Handler

As a workaround, you can add a copy of the module file as JAR file to WEB-INF/lib folder. You can simply rename the mar file as jar file before copy it to lib folder.

Finally, you can access the Administration module use the following URL: http://localhost:5565/web/axis2/axis2-admin/
image005

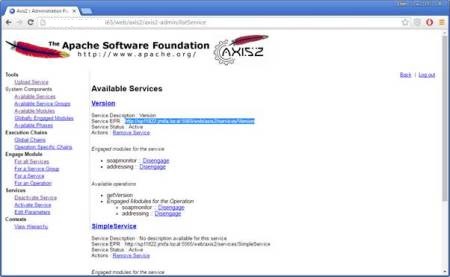
Click on System ComponentsAvailable Services, you can find default service called version has been deployed.
image006

Add WSDL into SOAPUI http://localhost:5565/web/axis2/services/Version?wsdl and test from there. You can verify SOAP request and response from SOAP Monitor utility listed above.

You might be curious to find SOAP messages in server.log. Nope! As the URL contains the “/web” directive, Integration Server’s dispatcher forwards the request to the logic in the WmTomcat package.

WS-ReliableMessaging in webMethods as provider

WS-ReliableMessaging in webMethods as provider
Integration Server uses the WS-ReliableMessaging protocol to reliably send SOAP messages between web service providers and clients even if the destination endpoint is temporarily unavailable or if the network connection fails. The WS-ReliableMessaging protocol defines how messages should be sent again if they are not delivered successfully, thereby ensuring that the messages are delivered to the destination endpoint and that duplicate messages are not delivered.

webMethods 9 Integration Server supports WS-ReliableMessaging Version 1.1 only. Hence the namespace prefix wsrm should use the URI http://docs.oasis-open.org/wsrx/wsrm/200702. For more details about WSRM 1.1, please visit http://docs.oasis-open.org/ws-rx/wsrm/200702/wsrm-1.1-spec-os-01-e1.html

Message exchange example
The following figure illustrates a possible message exchange between two reliable messaging Endpoints A and B.

Create web service provider implement WSRM in webMethods
To use WS-ReliableMessaging, you can attach a pre-defined WS-Policy named ReliableMessaging that Integration Server provides. This policy is available in the following directory: Integration Server_directoryconfigwsspolicies

Integration Server provides pub.soap.wsrm built-in services to create and manage reliable messaging sequences. These services are useful when Integration Server acting as web service client.

One tricky thing here is the flow service attached to this provider descriptor should only have input. This means the web service created in webMethods is in one way (request) mode not a normal request/response mode.

Test WSRM from SOAPUI
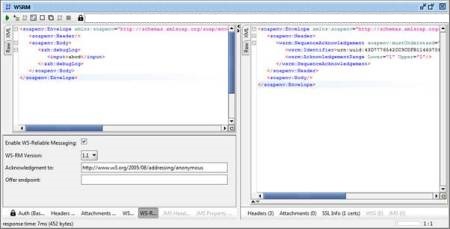
Enable WS-RM if desired and set the corresponding version. Now when sending the request SOAPUI will first initiate a WS-RM Sequence with the target service and use that for the request. After completed the WS-RM Sequence will be closed accordingly.
image0032.jpg

If you switch to http log view, you will find SOAPUI actually make four SOAP requests to the destination. CreateSequence -> ActualWebService -> CloseSequence -> TerminateSequence. With this information, we can build our own version of test cases without using the build-in options in SOAPUI.

Build test cases in SOAPUI test suite

Step1. Add property named Identifier in properties list.

Step2. Add SOAP request named createSequence. This web service will get sequence identifier from Integration Server. Remember to select Skip SOAP Action as true so SOAPUI won’t put SOAP Action in http header.

Step3. Save Identifier from step2 into properties list. This value will be used for the following SOAP request steps.

Step4. Add SOAP request as the first request. Replace Identifier in SOAP request as the value in step3. Set message number to 1 which means this is the first message in sequence. The response in SOAPUI:

<wsrm:AcknowledgementRange Lower=”1″ Upper=”1″/>

Step5. Add a second SOAP request similar to step4. Set message number to 3. The response in SOAPUI:

<wsrm:AcknowledgementRange Lower=”1″ Upper=”1″/>
<wsrm:AcknowledgementRange Lower=”3″ Upper=”3″/>

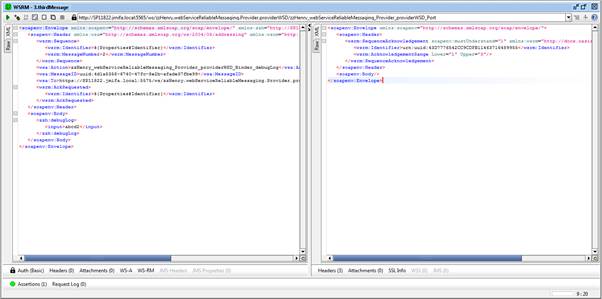
Step6. Add a third SOAP request similar to step4. Set message number to 2. This is to test when web service client send requests in wrong order, how Integration Server handles them.

<wsrm:AcknowledgementRange Lower=”1″ Upper=”3″/>

Step7. Add SOAP request named closeSequence. The response from Integration Server will be HTTP/202 Accepted.

Step8. Add SOAP request named terminateSequence. The response from Integration Server will be HTTP/202 Accepted.

Delivery assurances: InOrder
Messages from each individual Sequence are to be delivered in the same order they have been sent by the Application Source. The requirement on an RM Source is that it MUST ensure that the ordinal position of each message in the Sequence (as indicated by a message Sequence number) is consistent with the order in which the messages have been sent from the Application Source. The requirement on the RM Destination is that it MUST deliver received messages for each Sequence in the order indicated by the message numbering.

My previous example simulates the 2nd message in sequence lost in transit and resend to destination after the 3rd message transmitted.

For webMethods server log file, you will find webMethods will NOT process the 3rd message until it received the 2nd message in sequence. This is how webMethods guarantee message delivery in order.

Asynchronous web service using WS-Addressing in webMethods

WS-Addressing in short

· a W3C standard for embedding addressing information in the SOAP message = less dependence on the transport protocol.
· Message identification via MessageID.
· Request-response matching via RelatesTo (very important for asynchronous scenarios; the synchronous case does not require this because it is tied to a single HTTP connection).
· Support for more complex message flows via ReplyTo and FaultTo.

To process responses asynchronously using WS-Addressing

· Ensure that the WS-Addressing policy you want to use is attached to the web service descriptor.
· While invoking the corresponding web service connector service, specify this response endpoint address as the value for ReplyTo and/or FaultTo address.

Example project

Create a new flow service named debugLog in designer. This service is to divide input1 by input2 and return the value as output. Below is the service input/output signature.

Create another flow service named debugLogResponse in designer. This service uses the output signature of debugLog as its input signature. We need this service to help creating mock service in SOAPUI.

Create another 2 flow services debugLogAdd and debugLogAddResponse similar to we have created above. The debugLogAdd service is to add input1 by input2 and return the value as output.

Now we should have 4 flow services in designer. Add them all into WS provider descriptor and then add Addressing as policy.

Import the WSDL that contains 4 operations in SOAPUI.

Create mock services which handle the web service response from webMethods asynchronously.

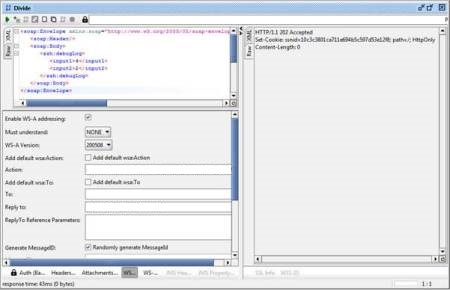
Enable WS-A configuration for debugLog web service in SOAPUI. Make sure you have ticked the checkbox of “Enable WS-A addressing” and “Generate MessageID”. The response is 2 which worked out as 4/2.
image0061.jpg

Receive response asynchronously. Use “Reply to” field in WS-addressing header to redirect the response to a call back endpoint. The client sends the request with an indication (ReplyTo header) that he wants the response to a third actor – the callback endpoint (mock service in this example). The server replies immediately with an HTTP 202 status which informs the client that the request has arrived and its processing has started. When the task is finished the server sends a request to the callback endpoint (listening at ReplyTo address). This is the response that the client expects. The response will be correlated with the corresponding request using the RelatesTo header.

Set reply to as http://localhost:8080/ which mock service is running on that port.
image0072.jpg

Check the response received by mock service.
image0081.jpg

We can also send back the SOAP Fault asynchronously by using Fault to field in WS-Address header. To capture SOAP Fault in mock service, you need to choose an operation to handle any incoming SOAP Fault. I choose debugLogResponse in my example.
image0091.png

Now we can change input 2 as zero to force an exception in flow service then a SOAP fault will be return as response.
image010.jpg

Check mock service to find the SOAP Fault returned.

X.509 Authentication implemented as WS-Security policy

X.509 Authentication implemented as WS-Security policy

In cryptography, X.509 is an important standard for a public key infrastructure (PKI) to manage digital certificates and public-key encryption and a key part of the Transport Layer Security protocol used to secure web and email communication.

An ITU-T standard, X.509 specifies formats for public key certificates, certificate revocation lists, attribute certificates, and a certification path validation algorithm.

The X509Authentication policy uses X.509 certificates to provide client authentication and includes a Timestamp token to guard against replay attacks. This policy does not enforce signatures or encryption.

Implement X.509 authentication in webMethods

Attach X509 Authentication policy to your web service descriptor in webMethods

Refer to: https://advwmdeveloper.wordpress.com/2016/05/10/setup-client-certificate-authentication-in-webmethods-and-test-with-soapui/ to setup client certificate in SOAPUI and webMethods.

Add outgoing WS-Security configurations for X.509 in SOAPUI. Make sure you have included timestamp.
image0021.jpg

Apply WS-Security setting to your SOAP request.
image0031.jpg

If you switch to “Raw” format of the request, you can find X509 in the security token segment.

Implement X.509 authentication with encryption

Similar to the previous steps, attach X509 Authentication, Signature and Encryption policy to your web service descriptor in webMethods

The server certificate is used by encrypt the SOAP message. You can download server certificate by access WSDL via HTTPS. Export the server certificate in X.509 der format. Save server certificate into a java key store (.jks)

JKS that contains server certificate
image0051.png

Add server certificate into keystore in SOAPUI.
image006.jpg

Add outgoing WS-Security configurations for X.509 with encryption in SOAPUI. You need to have timestamp, signature and encryption as required by webMethods policy. The “password” value for encryption is not needed, because no private key is needed to encrypt a SOAP message.

image0071.jpg

To decrypt and validate signatures of the response messages, you need to setup incoming WS-Security configurations. Since the WS-Security headers of the response message contain most of the information required to decrypt or validate a message, the only configuration needed by SoapUI is which keystore or truststore that should be used.
image008.jpg

The decrypt keystore should be the same keystore you used as signature in outgoing WSS and the signature keystore should be the one you used as encryption in outgoing WSS.

Apply WS-Security setting to your SOAP request and test it!
image009.jpg

The response SOAP body has been decrypted correctly. You can find the encrypted response value by switch to “Raw” view. The raw value is stored in field CipherValue.

There are some known issues in SOAPUI 5.1.3. Please refer the following link to fix it. http://stackoverflow.com/questions/28582769/how-to-decrypt-recieving-message-from-wso2-secured-proxy-service-in-soap-ui-5-0

Easiest fix is this:
Go to C:Program FilesSmartBearSoapUI-5.1.3lib
Rename wss4j-1.6.16.jar to wss4j-1.6.16.jar.old
Copy wss4j-1.6.2.jar from same location for SoapUI 4.5 to this folder.

Basic Authentication vs WS-Security username token

Basic Authentication vs WS-Security username token

Basic-authentication and WS-security username/password authentication both are different and independent.

Basic Authentication
Basic authentication is used in HTTP where user name and password will be encoded and passed with the request as a HTTP header.

POST http://localhost:5565/ws/zzHenry.webServiceSecurity.Provider.providerWSD_http/zzHenry_webServiceSecurity_Provider_providerWSD_http_Port HTTP/1.1
Accept-Encoding: gzip,deflate
Content-Type: text/xml;charset=UTF-8
SOAPAction: “zzHenry_webServiceSecurity_Provider_providerWSD_http_Binder_debugLog”
Content-Length: 325
Host: localhost:5565
Connection: Keep-Alive
User-Agent: Apache-HttpClient/4.1.1 (java 1.5)
Authorization: Basic AAAAA=

<soapenv:Envelope xmlns:soapenv=”http://schemas.xmlsoap.org/soap/envelope/&#8221; xmlns:zzh=”http://localhost/zzHenry.webServiceSecurity.Provider:providerWSD_http”&gt;
<soapenv:Header/>
<soapenv:Body>
<zzh:debugLog>
<input>abcd</input>
</zzh:debugLog>
</soapenv:Body>
</soapenv:Envelope>

Username and password will be encoded using base64 and which is used in authorization header.

The most common to access a webservice hosted in webMethods is using basic authentication. In SOAPUI, at “Authentication” tab, choose “Basic” as authorization type and provide username and password. If you switch to “Raw” format of the request, all the HTTP headers are visible and you can see the Basic Authorization header is highlighted in yellow.

When we use Basic-authentication, the username and password setting is on the HTTP headers not in the SOAP message which might include SOAP header and SOAP body.
image001.jpg

WS-Security username token

You can secure webservices using WS-Security username/password authentication mechanism that is a simple mechanism to secure services. It enforces user to provide Username Token security header in the SOAP requests. When create webservice descriptor in webMethods, you need to attach “Username over Transport” policy, this will force Username Token as part of the SOAP request.

To setup WS-Security in SOAPUI, please refer to:
https://www.soapui.org/soapui-projects/ws-security.html

Add client self-signed certificate into keystore.
image002.jpg

Add outgoing WS-Security configuration. Below is the sample to add username token as security.
Enter the username/password that has the privilege to access webMethods webservice.
Add timestamp as part of security as this is defined in webMethods policy file.

Apply WS-Security setting to your SOAP request. Open the SOAP request that you want to apply the username token to and click the Authentication tab in the bottom corner and select the outgoing WSS configuration.

Test your request in SOAPUI. Remember to use HTTPS endpoint instead of HTTP.
image005.jpg

If you switch to “Raw” format of the request, all SOAP message content is visible and you can see the Username Token in WS-Security is highlighted in yellow.

POST https://localhost:5575/ws/zzHenry.webServiceSecurity.Provider.providerWSD_http/zzHenry_webServiceSecurity_Provider_providerWSD_http_Port HTTP/1.1
Accept-Encoding: gzip,deflate
Content-Type: text/xml;charset=UTF-8
SOAPAction: “zzHenry_webServiceSecurity_Provider_providerWSD_http_Binder_debugLog”
Content-Length: 1226
Host: localhost:5575
Connection: Keep-Alive
User-Agent: Apache-HttpClient/4.1.1 (java 1.5)

<soapenv:Envelope xmlns:soapenv=”http://schemas.xmlsoap.org/soap/envelope/&#8221; xmlns:zzh=”http://localhost/zzHenry.webServiceSecurity.Provider:providerWSD_http”&gt;
<soapenv:Header>
<wsse:Security xmlns:wsse=”http://docs.oasis-open.org/wss/2004/01/oasis-200401-wss-wssecurity-secext-1.0.xsd&#8221; xmlns:wsu=”http://docs.oasis-open.org/wss/2004/01/oasis-200401-wss-wssecurity-utility-1.0.xsd”&gt;
<wsu:Timestamp wsu:Id=”TS-7991F70E1E3D94C684146294521076478″>
<wsu:Created>2016-05-11T05:40:10.764Z</wsu:Created>
<wsu:Expires>2016-05-11T05:42:10.764Z</wsu:Expires>
</wsu:Timestamp>
<wsse:UsernameToken wsu:Id=”UsernameToken-7991F70E1E3D94C684146294521076477″>
<wsse:Username>def </wsse:Username>
<wsse:Password Type=”http://docs.oasis-open.org/wss/2004/01/oasis-200401-wss-username-token-profile-1.0#PasswordText”>def</wsse:Password&gt;
</wsse:UsernameToken>
</wsse:Security>
</soapenv:Header>
<soapenv:Body>
<zzh:debugLog>
<input>abcd</input>
</zzh:debugLog>
</soapenv:Body>
</soapenv:Envelope>

Execution ACL permission

If you have both username/password in HTTP header and username token in SOAP header, which account will be used to execute webservice in webMethods?

When request comes to webMethods, Integration Server will check if account in HTTP header has the privilege or not. Once account in HTTP header has the permission, then Integration Server use the account in SOAP header to execute the service. In the other words, account in HTTP header should have the permission to access Integration Server while account in SOAP header should have the permission to execute the service.

To test this scenario, you can’t really do it using SOAPUI, use PowerShell instead. It gives more power to manipulate the xml request.

$request=@”
<soapenv:Envelope xmlns:soapenv=”http://schemas.xmlsoap.org/soap/envelope/&#8221; xmlns:zzh=”http://localhost/zzHenry.webServiceSecurity.Provider:providerWSD_http”&gt;
<soapenv:Header>
<wsse:Security xmlns:wsse=”http://docs.oasis-open.org/wss/2004/01/oasis-200401-wss-wssecurity-secext-1.0.xsd&#8221; xmlns:wsu=”http://docs.oasis-open.org/wss/2004/01/oasis-200401-wss-wssecurity-utility-1.0.xsd”&gt;
<wsu:Timestamp wsu:Id=”TS-7991F70E1E3D94C6841462949426574114″>
<wsu:Created>2016-05-11T07:07:26.574Z</wsu:Created>
<wsu:Expires>2016-05-11T07:12:26.574Z</wsu:Expires>
</wsu:Timestamp>
<wsse:UsernameToken wsu:Id=”UsernameToken-7991F70E1E3D94C6841462949426574113″>
<wsse:Username> def </wsse:Username>
<wsse:Password Type=”http://docs.oasis-open.org/wss/2004/01/oasis-200401-wss-username-token-profile-1.0#PasswordText”&gt; def </wsse:Password>
</wsse:UsernameToken>
</wsse:Security>
</soapenv:Header>
<soapenv:Body>
<zzh:debugLog>
<input>abcd</input>
</zzh:debugLog>
</soapenv:Body>
</soapenv:Envelope>
“@

$user = ‘abc’
$pass = ‘abc’
$pair = “$($user):$($pass)”

$encodedCreds = [System.Convert]::ToBase64String([System.Text.Encoding]::ASCII.GetBytes($pair))

$basicAuthValue = “Basic $encodedCreds”

$dict = @{}
$dict.Add(‘SOAPAction’,’zzHenry_webServiceSecurity_Provider_providerWSD_http_Binder_debugLog’)

$dict.Add(‘Authorization’,$basicAuthValue)

$response=@{Content=”}

[System.Net.ServicePointManager]::ServerCertificateValidationCallback = {$true}

$response=Invoke-WebRequest ‘https://localhost:5575/ws/zzHenry.webServiceSecurity.Provider.providerWSD_http/zzHenry_webServiceSecurity_Provider_providerWSD_http_Port&#8217; -Method POST -Body $request -ContentType ‘text/xml; charset=utf-8’ -Headers $dict

$response.Content

To verify it, insert wm build-in service wm.monitor.util:getCurrentUser into your flow service, it will return the account that execute service.

Setup client certificate authentication in webMethods and test with SOAPUI

webMethods has three types of Client Authentication when Integration Server performing requests that arrive on its HTTPS port. One of them is Require Client Certificates, this means Integration Server requires client certificates for all requests.

By using a client certificate, you don’t need to provide user/pin to identify yourself when login to Integration Server.

What is a client certificate?

A client digital certificate or client certificate is basically a file, usually protected with a password and loaded into a client application (usually as PKCS12 files with the .p12 or .pfx extension).

Config Integration Server as an SSL Server

– Generate a public/private key pair using key store explorer. This certification will be used as server certification.

o Select key store type as JKS.

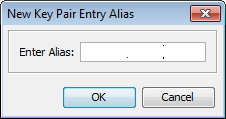
o Enter key pair alias. Use your server domain name as alias.
image002

o Enter key store password. This key store password is important when setup key store in webMethods.

image003.png

– Install the certificate in Integration Server

o Install the keystore via Security -> Keystore -> Create Keystore Alias on IS’s web frontend.
image004.png

o To verify the key store has been loaded.
image005.png

o Install the certificate via Security -> Certificates -> Edit Certificates Settings. Please notice we don’t have truststore setup at the moment and we will setup this up when we create client certificate.
image006.png

– Add an HTTPS Port in Integration Server:

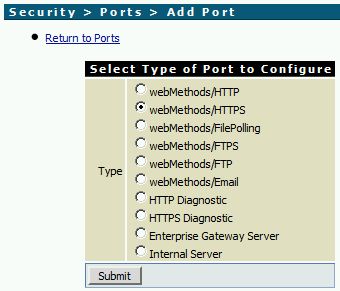
o Add HTTPS port via Security -> Ports -> Add Port

o Select require client certificate as client authentication methods. Again here we will setup truststore alias later.
image008.png

o Test the HTTPS connection by navigating to https://localhost:5575 in IE.

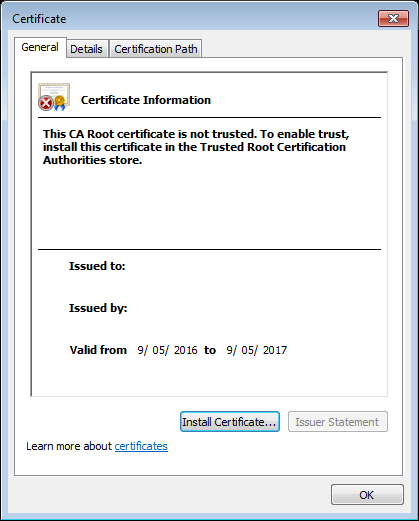
The certificate error is ok, because we self-signed our certificate. Add the certificate to the list of trusted certificates and move on. If you use a “real” certificate later, the error will go away.
image009.png

Config SOPAUI as SSL client

– Similar to generate server certificate, generate a client certificate using key store explorer but choose PKCS #12 as store type

o Select key store type as PKCS #12.

o Enter key pair alias. Use your name and local pc name as alias.
image011.png

o Enter key store password. This key store password is important when setup key store in SOAPUI.
image012.png

– Export client certificate and include it in trust store. This is to enable webMethods integration server to accept a self-signed certificate.

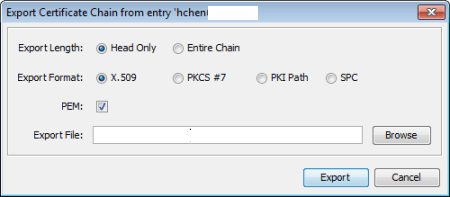
o Right click on the key pair, select export -> export certificate chain. Select X.509 as export format.
image013.png

o Create java key store (.jks) to include the cert that generate in the previous step.
image014.png

– Config trust store in webMehtods.

o Create truststore via Security -> Keystore -> Create Truststore Alias on IS’s web frontend.
image015.png

o We should have both keystore and truststore setup in webMethods by now.
image023.jpg

o Install the truststore via Security -> Certificates -> Edit Certificates Settings. Select truststore as alias from the drop down list.
image018.png

o The final step to associate client certificate with a correspondence user in webMethods via Security -> Certificates -> Configure Client Certificates Settings.
image019.png

– Use client certificate in SOAPUI

o Select the client key store in SOAPUI preference -> SSL settings.
image024.jpg

o Test your client cert in SOAPUI! You will find the SSL information in the response.
image025.jpg

As I mentioned at the beginning, try to login to IS’s web frontend using HTTPS to see if you were asked for a user/pin!

Connect webMethods to WebSphere MQ as JMS provider

Copy the following files from MQ installation directory to WM integration server directory (IntegrationServer\lib\jars):

WebSphereMQ\java\lib\com.ibm.mq.commonservices.jar
WebSphereMQ\java\lib\com.ibm.mq.headers.jar
WebSphereMQ\java\lib\com.ibm.mq.jar
WebSphereMQ\java\lib\com.ibm.mq.jmqi.jar
WebSphereMQ\java\lib\com.ibm.mq.pcf.jar
WebSphereMQ\java\lib\com.ibm.mqjms.jar
WebSphereMQ\java\lib\dhbcore.jar
WebSphereMQ\java\lib\mqcontext.jar

mqcontext.jar can be found in github.com while other jars provided by IBM by default installation.
https://github.com/khaliqgaffar/jboss_esb_eval_proj/blob/master/AuditMonitor/esbcontent/lib/mqcontext.jar

Restart webMethods integration server.

Setup new TCPIP listener in MQ and start it.
MQ.Add Listener

Add JNDI service provider in MQ as JMS administered objects MQ
Provider URL: servername:port/SYSTEM.DEF.SVRCONN (port is the one created in step 3)
Initial Context Factory: com.ibm.mq.jsm.context.WMQInitialContextFactory
Required Libraries: mqcontext.jar
Connect this context factory.
mq-add-jndi.jpg

Add MQ Connection Factory.
Make sure you select “Connection Factory” as type to view both Queue and Topic.
MQ.Add Factory

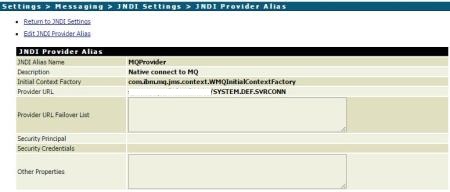
Add JNDI service provider in webMethods.
Under IS Admin – Setting — Messaging – JNDI Settings – Create JNDI Provider Alias.
mq-add-jndi-provider.jpg
Test JNDI Provider:
MQ.Test JNDI Provider

Add JMS Connection Alias in webMethods.
Under IS Admin – Setting — Messaging – JMS Settings – Create JMS Connection Alias.
JNDI Provider Alias: MQProvider (JNDI created in step 6)
Connection Factory Lookup Name: DEFAULT (Connection factory created in step 5)
MQ.Add JMS Connection
Enable the JMS connection.

Send JMS message from webMethods to MQ use service pub.jms:send
MQ.JMS send

Retrieve JMS message from MQ use JMS trigger
MQ.JMS trigger